Wordで学術論文の原稿を書く場合、「アウトライン」機能を使うと便利。
ってゆーか、どんな文書でも、タイトル/サブタイトルがあるものはアウトライン機能を使った方が良い。
今回は個人設定の備忘録。
学術論文原稿の基本設定
フォントやサイズはだいたい共通だけど、必ず投稿先ジャーナルの投稿規定に合わせる。
私の場合は、基本的に下記のように設定。
フォントや行間の設定
フォントは、Home → Font で設定
- Font: Times New Roman
- Font Size: 12 Pt
行間は、Home → Paragraph で設定
- Line spacing: 1.5 or 2.0 lines
行番号の設定
行番号は、Layout → Page Setup → Line Numbers で設定
- Line Numbers: Continuous
アウトライン機能の使い方
アウトラインの基本設定
「Alt → W → U (もしくは、View → Views → Outline)」 でアウトラインビューにする。
各学術誌の投稿規定に従って、必要な項目を入力
e.g.
- タイトル
- 共著者名
- 所属
- コレスポ情報
- Running title
- Keywords
- Abstract
- Introduction
- Material and Methods
- Results
- Discussion
- Acknowledgements
- Conflict of Interest
- References
- Tables
- Figure Legends
etc...
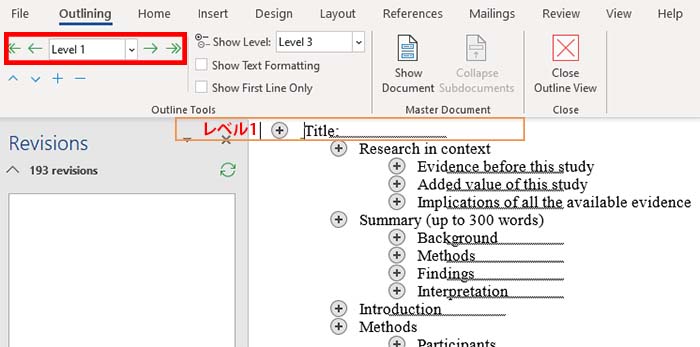
タイトルを選択して Level 1 に
1. タイトルを選択 。
2. 「Alt → U → O」で、レベルリストがひらく。
3. リボン上のOutline Toolsの左上の項目から、レベル1を選択。
(もしくは、「Shift + Alt + 左カーソル(F13 + H)」)
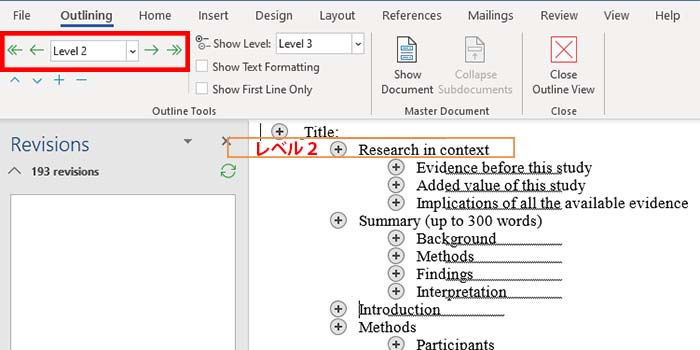
サブタイトルを選択して Level 2 に
1. 一つ下の階層 (Level 2) のサブタイトルを記述していく。
e.g.
- Abstract
- Introduction
- Methods
- Results
- Conclusions
etc...
2. Level 2 用の小項目を選択(Shiftで連続選択、Ctrlで断続選択が可能)
3. 「Alt → U → O → Level 2」に設定。
(もしくは、リボン上のOutline Toolsの左上の項目から、レベル 2 を直接選択)
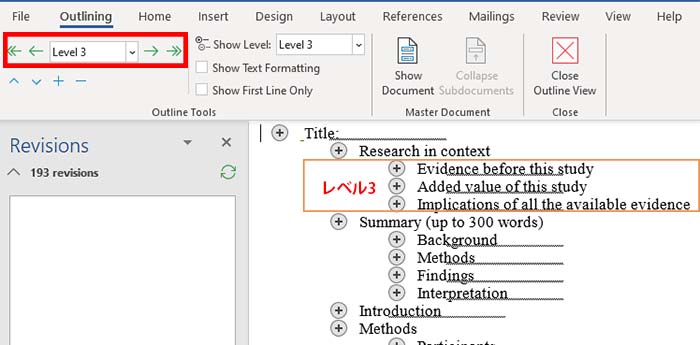
さらに下の階層も設定
必要に応じて、Level 3 以降もレベル付けする。
eg.
Abstract内の
- Background
- Methods
- Results
- Interpretation
etc...
タイトル・サブタイトル以外の文章は "Body Text" に設定される。
途中でサブタイトルを追加したい場合は、その都度レベル付する。
レベル付けのショートカット
実際には、ショートカットを利用した方が早い。
- 「Shift + Alt + 右カーソル」で、一つレベルを下げる
- 「Shift + Alt + 左カーソル」で、一つレベルを上げる
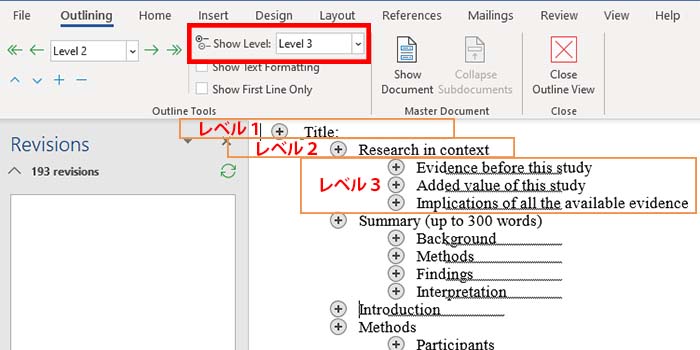
表示設定
1. 「Alt → U → V (もしくは、Outlining → Outline Tools → Show Leve)→ Level 1」を選択すると、Level 1 のみが表示される。
2. 同様に、Level 2 を選択すると、Level 1 と Level 2 が表示される。
3. すべて表示したい時は、"All levels" にする。
各見出しのスタイルの設定
「(Alt → W → U →) Alt → U → T」で、"Show Text Formatting" を ON にしておく。
Heading 1 の設定
Heading 1 は
- Times New Roman
- 14 pt
- bold
に設定する。
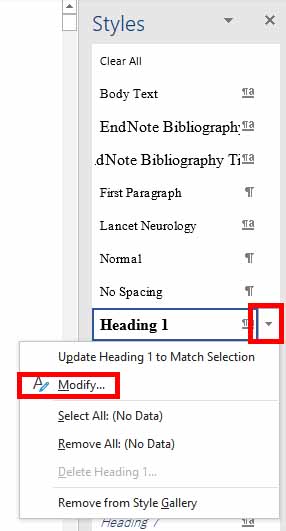
1. 「Alt → H → FY」もしくは、「ホーム画面 → Style → 拡張ボタン」で Style を開く。

2. Heading 1 を選択し、その右隣にある ▼ を押す。
3. Modify を選択。
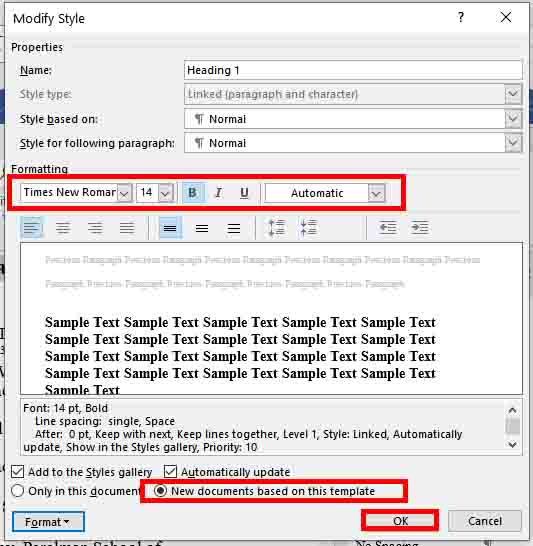
4. Formattingの項目を、
- Times New Roman
- 14 pt
- Bold
- Color: Automatic
に設定する。
"Add to the Styles gallery" と "New documents based on this template" と "New documents based on this template" に☑を入れて、OK をクリック。
Heading 2 の設定
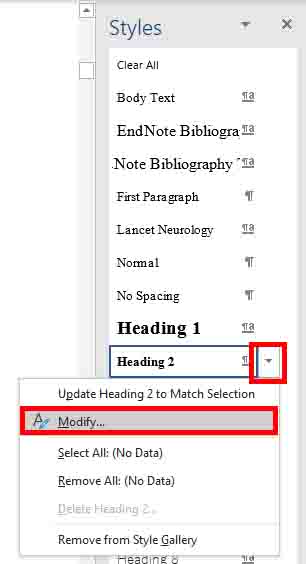
1. 「Alt → H → FY」もしくは、「ホーム画面 → Style → 拡張ボタン」で Style を開く。
2. Heading 2 を選択し、その右隣にある ▼ を押す。
3. Modify を選択。
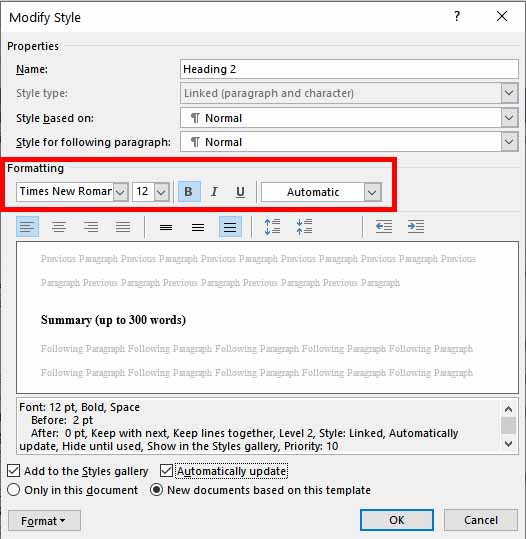
4. "Style based on:" と "Style for following paragraph:" の欄は "Normal" に設定する。
5. Formattingの項目を、
- Times New Roman
- 12 pt
- Bold
- Color: Automatic
に設定する。
"Add to the Styles gallery" と "New documents based on this template" と "New documents based on this template" に☑を入れて、OK をクリック。
Heading 3 以降の設定
Heading 3 は、Heading 2 と同じ設定内容にする。
- Times New Roman
- 12 pt
- bold
- Color: Automatic
ナビゲーションビューの使用
1. 「Alt → w → K」で、Navigation Pane に☑を入れる。(View → Show → Navigation Pane → ☑)
2. 左側にNavigationが表示される。
3. "Headings" のタブを選択すると、各項目が一覧で表示される。
4. また、各項目をクリックすると、該当箇所に jump する事ができる。